This project blends together the concepts of multiple objects into a singular, hybrid object. My group consisted of Shayla and Sydney, and together we managed to incorporate three objects into the final design so that each of us had an original object represented in the work. First, we compared our objects and chose what we thought complemented each other, then we designed the hybrid and printed it out on the FDM printer.
Shayla's Objects:
Object 1:
This design relies on cylindrical legs for support that fan out instead of dropping straight down, which adds to the overall aesthetic. The centre funnels inward, the design a unique form. Because of the sturdiness of the legs, and the relative size of the base, the object would most likely be self-supporting. The object could not be printed using a 3D model however because of the funneled base. This design could function well as a table or as a cute robot. I dubbed it baby omnidroid because it looks like it could be an early prototype for the omnidroid from the incredibles (pictured below).
Object 2:
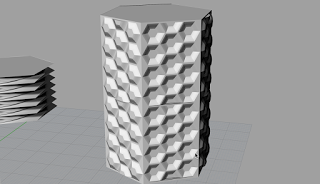
This design serves an aesthetic function, because of the jewel-like texture of the surface. It could also be used as a vase (and could look great as a glass object). The qualities that make it so pleasing to the eye are the sharp, repetitive angles and the overall pattern they form. Both versions of the object would be self-supporting and fairly solid due to their simple base structures. There could be an issue printing these objects (more specifically the shorter object) because there is the possibility of the angles being too sharp and close to horizontal.
Object 3:
This last design functions as an aesthetically pleasing vase/conversation piece. The form takes the shape of not only a vase but plays with negative and positive space to create the image of two faces as well. The object would be self-supportive because the base is wide enough to counterbalance the large top. There is potential for issues around the nose, but is likely to print fine.
My Objects:
Object 1:
The function of this design is to be pleasing to the eye. It could also be fun as a slide or make a cool water fountain. The form of the object is made up of large, ribbon-like twists. The overall shape of it is pyramid-like, with a larger base and thinner top. It has a large sturdy base and gets narrower towards the top, so it wouldn't have trouble supporting itself. Some of the edges could have a little too sharp of a curve to print properly.
Object 2:
This design was meant to be decorative, though it could serve as a pinwheel or blooming fake flower in a garden. There is a consistent spiral towards the centre and the familiar shape of a flower also makes up the form. It is a short, broad object that should have no difficulty supporting its own weight. It should also make for a successful print because there are no outstanding angles.
Object 3:
This object has a typical vase shape to it. The design is formed through staggered, rounded levels. It is definitely self-supporting because it is stocky and short. It is also alright to 3D print because it has no problematic looking angles attributed to it.
Sydney's Objects:
Object 1:
This design would make for a nice decoration or light. It is a familiar curved object with a hint of the fantastical and an almost archaic visual quality to it. It would be self-supporting with a bigger, sturdier base. Once that's fixed it would be great for 3D printing as well.
Object 2:
The function of this object is purely to resemble whipped cream. It's formed out of organic spirals that create an interesting, flowing texture. The structure would be sturdy enough to be self-supporting but the angles of its curves could prove problematic during the printing process.
Object 3:
This rendition of a lighthouse would function by providing light. Characteristics include a rectilinear base and a decorative top. The wide base would definitely be able to support the weight of the object and there are few problems to impede the design from printing well. The only real issue would most likely be the diamond cut at the top.
Almost immediately, we decided as a group to go with Sydney's lamppost design as a starting point for our hybrid. It just so happened that Shayla's vase/figure design would potentially look striking as the lit area of the lamppost and my abstract rounded stack would make the sturdy base Sydney's original design needed.
Shayla's Sketches:
These are five designs Shayla constructed while imagining what the hybrid could look like.
Marissa's Sketches:
These were my five sketches. For the final design, we ended up going off of lamp post #3.
^ This is a link to the previous post where I showed off the models and renders that we based off of lamp post #3
When it came time to 3D print, my group was lucky that we chose a Sunday morning. We went into the Thing Tank for our 8am time, and after an hour of organizing ourselves, we started printing the first of three pieces, from the base to the part before the light area. Besides making a mess of the tape on the bed, the print ran pretty smoothly (albeit pretty slow). It took a few hours. We had intended to print the last two parts that day as well (why not? We were the only ones signed up for the day so we figured we might as well take advantage). Of course, that's when our luck turned sour. We had disconnected the printer from the computer in between prints and it had cooled down. Not a big deal, right? Just re-connect it and get it to heat up again. Except getting the printer to warm up that time proved more challenging than any other part of this assignment. We waited. And waited. The stubborn printer refused to increase more than a couple degrees every 20 minutes or so (we updated the temperature constantly unable to believe that it could be so slow). Needless to say, we had to give up that day.
Our second time slot we figured, once again, we could get the parts we needed printed (we were wrong). We started the print with both the light and the top printing at the same time. Very soon, the top started to print in a way that did not look all that proper. Stretched for time, but not willing to waste plastic on a failed part, we stopped the print and restarted it with only the second part (the light) printing.
Our last print was smooth sailing (probably because at that point the printer knew we only had one part left so it couldn't delay us further). We started printing right away and, despite starting later in our time slot, managed to finish 15 minutes ahead of schedule!
The first 3D print.
The second 3D print where we tried to print two before realizing it wouldn't work.
The third part being printed (after the success of the first and second parts).
Why are all of my videos clearly filmed in snapchat? Well I had send to them to make my two friends studying Computer Science and Engineering jealous of this amazing 3D print project because that's what you do when you have techy friends.
The final product! The pieces aren't actually stuck together in this photo but you wouldn't be able to tell because of my and Shayla's excellent stacking skills!